So, you have seen someone fly fish and have taken the step to your first fly rod, congratulations you have caught the bug. Just like so many of us, when we start, we look at some fabulous casters and wish we could do that.
I regularly watch videos of fly casting and wish I was at that level, which one day I hope to be.
Anyway, back to business and less daydreaming, so the best advice I can give to any beginner is to mark your fly lines. I like to start with about 30 – 35ft of line from the reel to the wool tag at the end of my leader. Let’s say I have a 9ft leader, this would mean I would mark my fly line at 21ft, thus giving me a 30ft or 26ft for a 35ft cast. Mark your line with a 3-4inch black mark, we now have our learning distance.
At this distance, we are going to familiarise ourselves with the fly rod and its actions. We are going to practice loop size, accuracy, casting arc and eliminate any problems we may have. Please keep in mind this doesn’t happen overnight, give yourself time to progress.
A good idea is to make a little five-minute video of your fly casting and keep a log, so you can watch your progress and diagnose any issues, you will be your own worst critic, so will progress faster this way as well.
I keep my practice sessions to 20 minutes of casting.
The First Cast On Grass
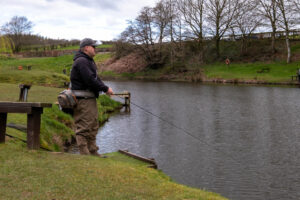
The first cast that most of us will do is not on the water but actually on grass. You will need to put together your rod, thread the line through the rings and also attach the leader, a 9ft leader is a good starting option. To the 9ft leader, tie on a piece of wool, this will act as the fly when you’re casting. Without this, you’ll notice a “whip” sound each time you back cast and come forward again. The wool stops this happening and accurately replicates having a fly attached to your leader.
So how do we cast? There are many videos and explanations out there, but this is the way that I start with anybody new to fly casting.
First we need to image two points A and B, these are hour hands on a clock, point A is 8 o’clock and point B is 1 o’clock. Keep these references in mind, I’ll refer to them often in the following text.
Pull the line out until you get to the 30ft / 35ft line mark, ensuring that the line is straight out in front of you.
Start with the rod tip just above ground at Point A and begin to lift the rod back towards point B. This is the beginning of the back cast. The movement between point A and point B is done mostly with the elbow, with a slight rotation of the wrist at the end. For now, just concentrate on the elbow and move on to the more technical side of the wrist later on.
Imagine that I gave you a dumbbell and I wanted you to curl it. You would do this movement with your elbow. With the rod at point A, curl the dumbbell until the rod tip is at point B. This is the back cast movement, but, it is important how this movement is done to get between point A and B, it requires smooth acceleration.
Think of the fly rod as a brush and the pain as your fly line. If I handed you a paint brush with some paint on it and asked you to stand 8 feet away from a wall and splat some paint on that wall, how would you do it?
A slow, steady movement, at the same speed, would mean the paint would fly off the brush in no particular direction. Where, if you started slow and finished fast, the pain would fly off the brush in the direction the brush is pointing in.
The start slow, finish fast movement is what I use. If I started fast, the pain would go everywhere, if I stayed at the same speed beginning to end, it would be hard to get the pain to leave the brush. However, if I start slowly accelerating the stroke and then stopping suddenly, the pain will fly off the brush. I’ve placed energy into the paint which the paint holds, but when the brush stops suddenly, the paint has the energy to give it the momentum to fly towards the wall. The key is that just before I stopped, my brush was moving at its fastest.
Let’s put this into practice, making our rod the paint brush. Let’s consider the brush to be our rod and the paint as our fly line.
- A bucket of paint in front of us.
- Dip the brush into the paint (Point A or 8 o’clock).
- Splat the wall behind us with paint (Stop at point B or 1 o’clock), using our start slow finish fast.
- Pause allowing the fly line to straighten behind you, when the line is straight, begin the forward cast. The weight of the fly line behind and you moving forward will load the rod with energy, as you’re moving the rod forward, use the start slow finish fast motion and stop at 10 suddenly, the line or “paint” will continue forward giving us the forward cast.
Tips
- Make sure to wear eye protection and a cap when practicing and use a wool tag on the end of your leader, the same goes for when you’re fishing using a fly.
- Watch the end of your fly line as it lay in front of you, when you lift the rod as soon as the fly line moves towards you, start your acceleration into the back cast.
- When fly casting watch your power, you should not be able to hear your fly rod or fly line cutting or whooshing the air, allow the rod to work, see how little effort you can put in keeping the acceleration movement there.
- When starting the cast the line will be laying on the grass, move the rod using the smooth acceleration to 1 o clock, if we are false casting we would move from 1 o clock to 10 o clock, once we want to lay the line back down again we stop at 10 on the forward cast and lower the rod as the line straightens, this lets everything straighten above the water and land perfectly.
- When back casting look over your casting shoulder slightly watching the fly line straighten and work on your timing (as the rod stops on the back cast at the one o clock position, say “cadence” then move the rod forward into your forward cast, saying the word should help with timing at our practice distance).
- Have fun and enjoy your new fly rod.
There is more to the overhead cast once we progress to make it even more efficient, but for now, this is your first rod, and you’re learning. Get used to the fly rod and all of what it is telling you through the handle.