Caster fishing. Is there a more exciting or more rewarding style of fishing when the fish are having the shell? Personally speaking, I don’t think so.
I love the “old carster” to quote the wonderful Dickie Carr. It’s a superb hook bait. Easy to use, clean, simple, easy to feed, and it picks out a better stamp of fish.
I’m sure many of you reading this will agree that there is nothing quite like the sense of anticipation and excitement you feel when you see the tell-tale indications of a bite developing on the canal or anywhere else for that matter when using the caster.
That sense of anticipation is heightened even more when pole fishing with this bait on canals. Canals, generally by definition, are tough venues with shy, wild fish, which take some coaxing and some catching – a million miles away from today’s fish-rammed commercial venues.
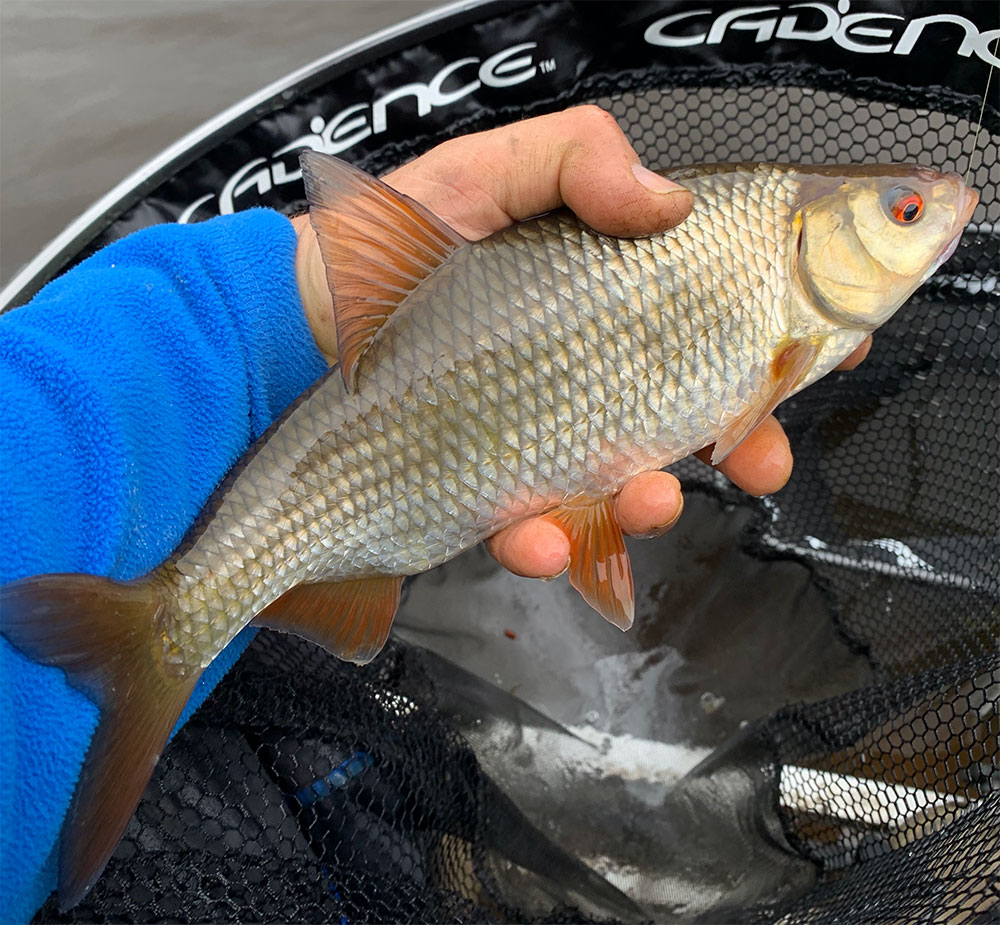
And the beauty of the caster is that it catches whatever swims – big perch love it, so do roach, bream, carp, tench, gudgeon and hybrids.
I started writing the bones of this blog around six months ago, shortly after Cadence invited me to be involved in a video about Caster fishing on the Leeds and Liverpool Canal.
Videos are a helpful guide and bring theory to life, but there is only so much information you can include in a video and, for those who were left with questions after watching it, here, hopefully, are some of the answers.
And seeing as we are in a state of limbo with the COVID-19 pandemic, it’s as good a time as any to publish it and for five minutes at least allow anglers’ minds to drift away to what we love doing best – fishing or reading about our magical sport.
Caster Fishing – In The Beginning
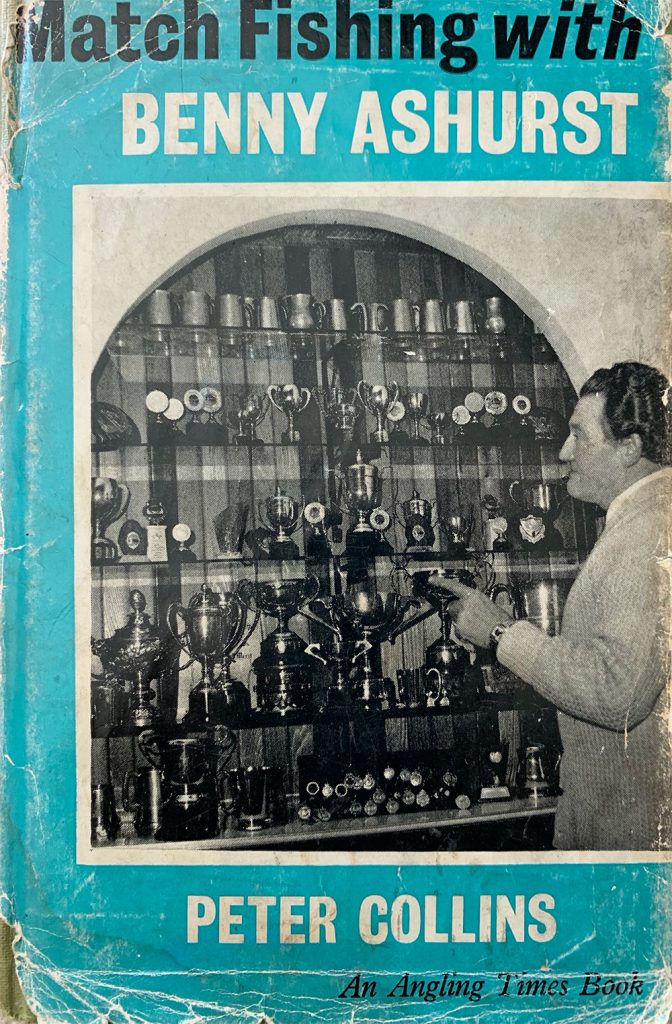
I think I am correct in stating that the advent of the caster was brought about by Leigh maggot breeder, the late, great Benny Ashurst.
The former miner, whose World Champion son Kevin still fishes the odd match on the Leigh Canal to this day, was a pioneer of many things which we take for granted in modern angling. The waggler, the stick float, legering techniques and the development of caster as a hookbait and loose feed.
You can read all about how he came across using casters as hook bait in his fantastic book, Match Fishing with Benny Ashurst, if you can get hold of a copy. An old friend from my youth, Geoff Peet, lent me his copy and more than 30 years later, when we reconnected on Facebook, I reminded him I still had it. Generously he said I could keep it. Thanks, Geoff, that was mighty kind of you, and it’s a book I treasure.
But I digress! So back when I worked for Angling Times in the early 1990s and the editor, Keith Higginbottom put me in charge of a feature each week called “Tackle That Swim”. It was a licence to roam the UK, picking my “victims” to fish a peg. These “victims” included both Benny and Kevin Ashurst, what a chance to spend a day on the bank with these fine anglers! It was a great way to indulge yourself and tap into their angling brains, learning loads into the bargain!
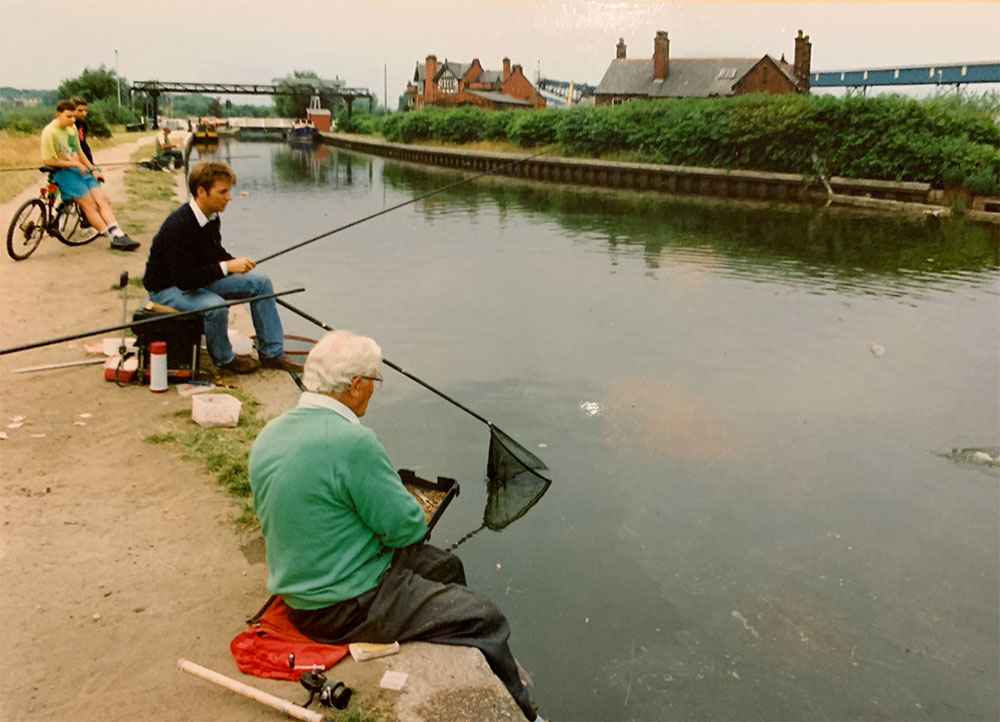
That memorable day with Benny was spent on the Bridgewater Canal at Plank Lane, Leigh, near to his bait farm.
At the age of 78, he showed his sheer class, catching getting on for 50lb of bream and big roach, fishing caster on the pole and on the tip in a wide near a disused mining pit.
Afterwards, we retired to the Fir Tree pub, at the top of his lane, where over a drink or seven he told me his life story – and what a vibrant, humour-filled story it was!
Turning Your Own Casters
As you would expect being a bait breeder, Benny always put great store in having top-quality, fresh bait and it is a simple but essential point that I have never forgotten.
Fresh is best, no question, so if you have access to high-quality, fresh, shop-turned casters, then lucky you. However, if you don’t live near a tackle shop that can provide top-quality casters, you need to understand how to turn your own.
Like most things in life, trial and error is the way to come up with a consistent formula for success, and I am going to outline how I always turn my casters, so here goes.
The important thing is to plan ahead. Let’s imagine I am fishing a match on a Sunday. I need to allow seven days to turn the bait, so I will lay down two pints of fresh, riddled white maggots, in four pints of old, dark sawdust the Friday or Saturday eight days before the match.
I keep the maggots on the floor of my garage, and in winter I may encourage them a little by bringing the container in the house on the Wednesday before the match, for 48 hours, if they are showing a reluctance to start turning. It always works. Just keep them somewhere where your significant other can’t find them – in my case in the dining room under the dining table!
But back to buying your bait and it is worth asking your local, friendly, neighbourhood tackle shop on which day they take delivery of their maggots. Some shops, in the summer months, have as many as three deliveries a week.
Always politely ask for the freshest bait in the shop. You want fresh, soft, big maggots, the bigger, the better. Don’t buy old bait if you can help it because old maggots tend to shrink and become tougher skinned.
On to initial preparation and if your local tackle shop sells maggots to you in maize, once you get home, remove the maize by riddling them on a pinkie riddle. If the tackle dealer sells them to you in sawdust, which is preferable, riddle the sawdust off them and keep it and bag it up for later use.
Step two is simply to put those new maggots through a maggot riddle a couple of times. Let them drop through the maggot riddle and discard any skins, fish bones or general debris left behind.
Next, you need a suitable container that will be used for the turning process. You want a container with a sealable lid that has a letter-box or rectangular hole cut out of it.
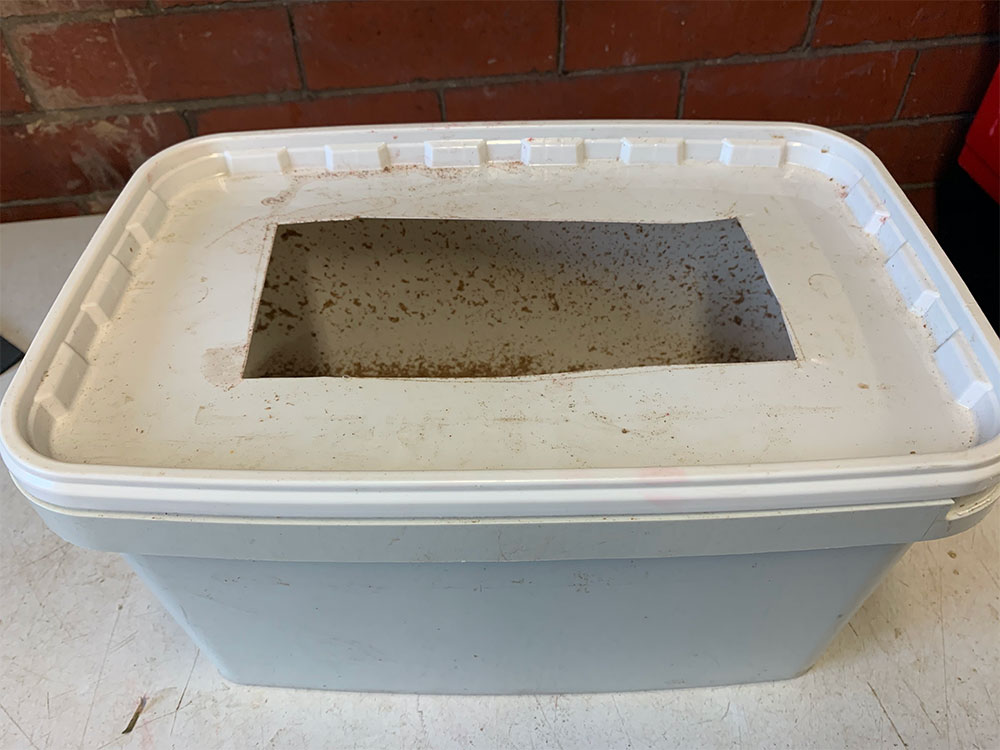
Take your two pints of white maggots and put them in the container alongside the four pints of sawdust. Older sawdust, as I touched on earlier, is preferable but it doesn’t matter if it is fresh, as long as you have enough.
Now it is time to give those caster maggots a “drink” of water. I add half a pint of water into the container which now contains the maggots and the sawdust, pouring it all down one hole in the centre of the container.
The maggots ingest some of the water, and it keeps them plump and helps to smooth the skin as they work through the sawdust. The importance of the lid with the letterbox-shaped hole now becomes apparent, as the maggots will crawl up the sides of the container, once damp, and they will crawl along the underside of the lid, before falling back into the sawdust once they reach the letterbox-shaped hole. Simple!
And trust me, your wife will thank me for this tip as it prevents escapees, which means no bluebottles at a later date swarming into the house and causing unnecessary earache!
At this point in the turning process, it is important to stress that you need to add a small amount of water, around a quarter of a pint, every couple of days. Don’t overdo it, or you will end up with sawdust which is too wet, meaning you won’t be able to riddle the maggots. The maggots still need to be riddled once a day to remove any further dead skins.
Things start to get interesting around day four out of the seven-day cycle. In simple terms, if you put them down in sawdust on the Friday night, we are talking about Tuesday night/Wednesday morning.
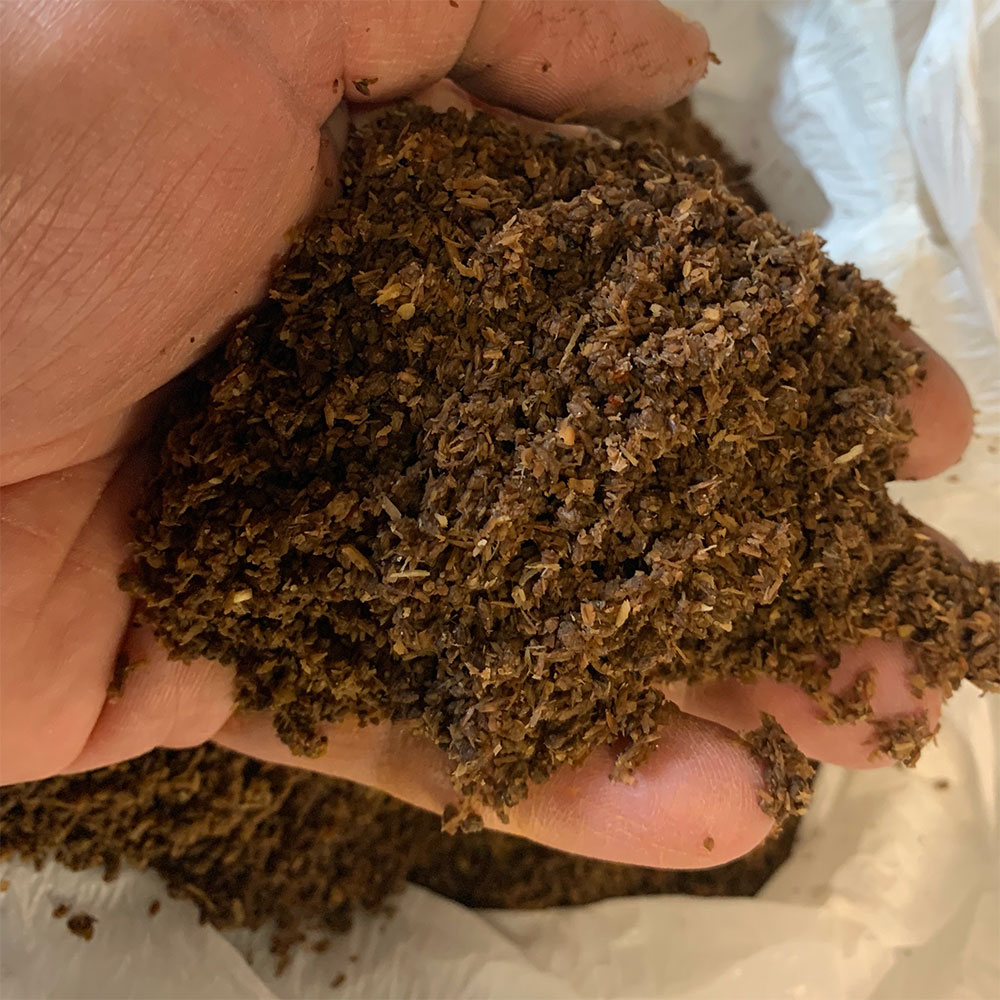
It is at this point that you should start to see the fruits of your labours, with odd casters starting to appear. This is when you need to riddle the maggots up to four times a day. You will see a gradual increase in the rate at which the maggots are beginning to turn.
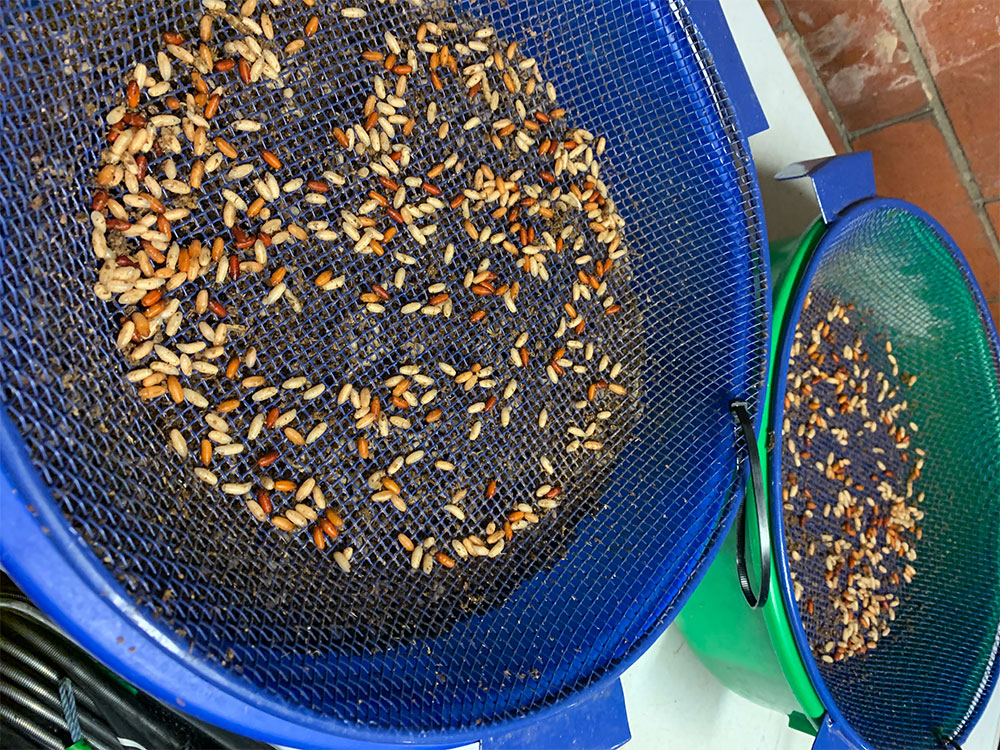
Again you start by riddling the maggots through a maggot riddle. You should now begin to see a few white casters left on top. Pick these off, transfer to a pinkie riddle and rinse with a hosepipe or watering can.
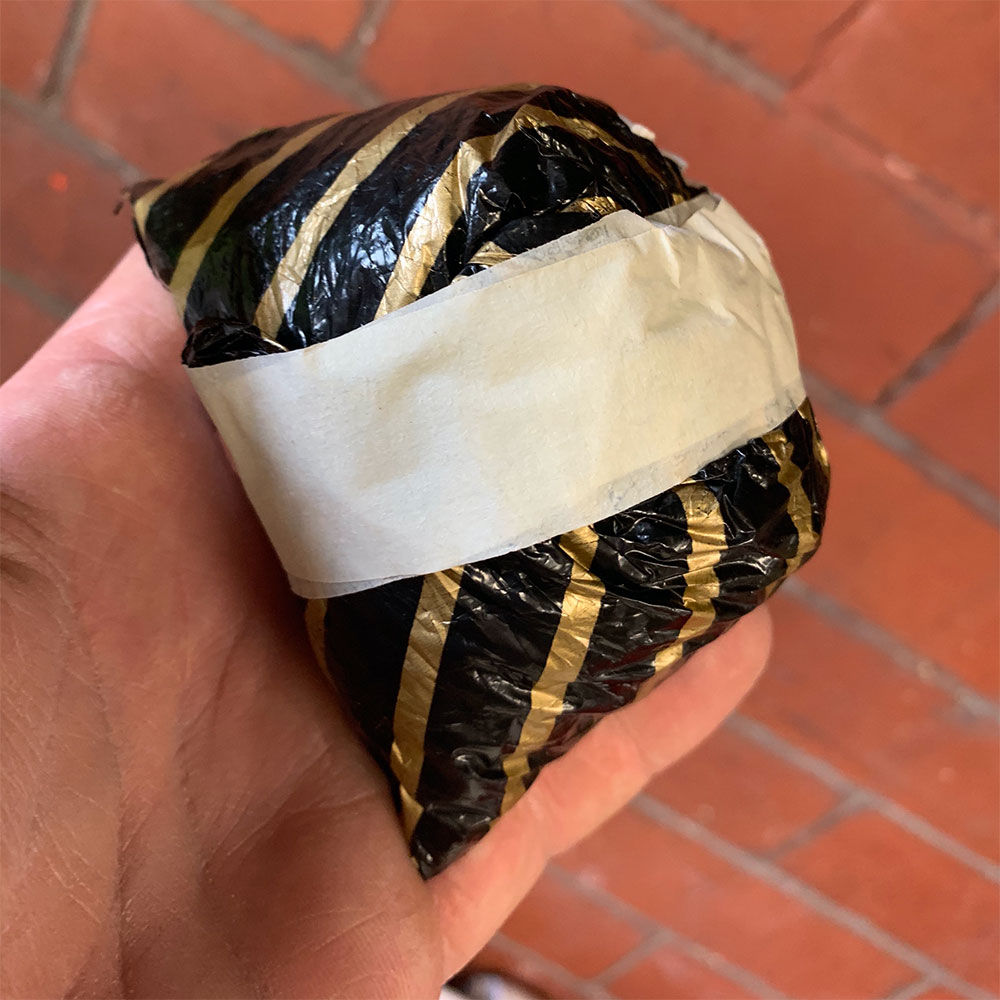
Let them air for 10 minutes then bag them up in small black plastic bags, knot down tight to remove any air, and keep in your bait fridge if you have one. I think black plastic bags are important as they don’t allow light through the plastic. Casters kept in clear plastic bags start to develop something called “bag burn”, which is a series of brown marks on the part of the shell where it has been in contact with the plastic. Black bags solve this and stop it happening.
Over the next three days, from Wednesday to Saturday, the frequency of riddling the now turning maggots needs to be stepped up to four times a day if you can manage it. In my case, that’s first thing when I get up, another riddle at lunchtime, one at tea-time and one final riddle before lights out.
Quality casters will last up to ten days as long as you remember to open the bags once a day for ten minutes, to allow the chrysalis or caster to “breathe” as it is a living thing and it needs a little air to stay alive.
I would say do not put them in water as they will die and then turn sour. You are better off bagging them in airtight bags and letting them have some air for five or ten minutes, once a day, to keep them fresh and alive.

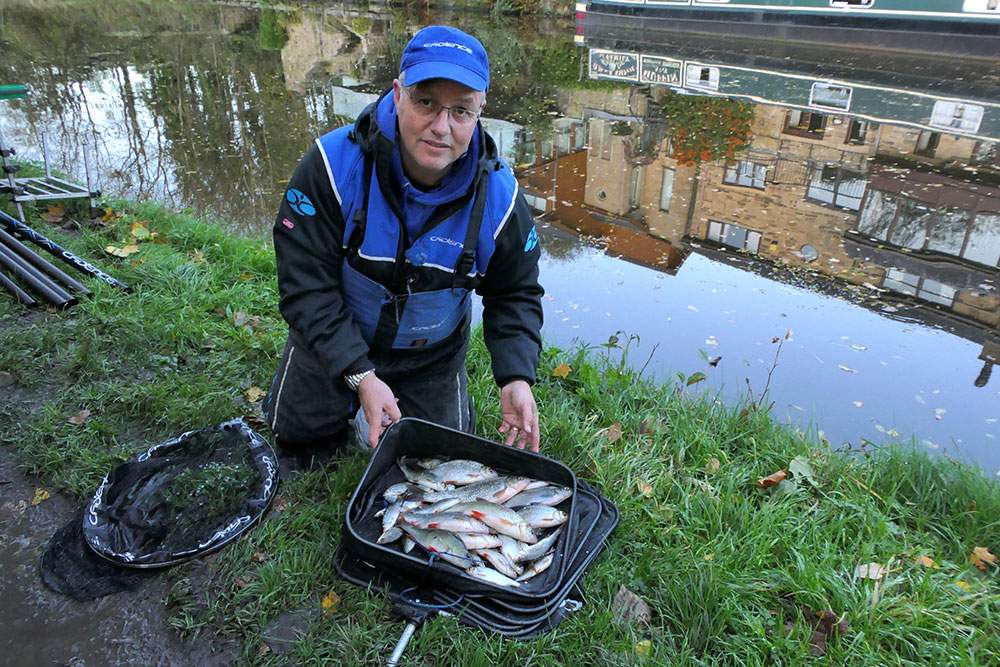
On The Bank – Areas To Fish
I think it would be foolish to blindly think you will only catch fish on the caster tight across to features such as overhanging bushes, boats and man-made features such as bridge parapets, etc.
On my local Leeds and Liverpool Canal, for example, you can catch fish on casters well away from cover, so emphasis needs to be placed on careful plumbing before you start a session. Frequently, you can catch fish by moving just a few inches beyond the point where the far side of the boat track starts to shallow towards the far bank.
Quite often you will catch by plumbing to the exact dead depth to the bottom of the vee or crease on the far side of the boat track. This is where the canal starts to slope up to the far bank. Simply adding on a half butt to your pole and pushing the rig a few inches further across, you’re laying on a few inches overdepth.
When the water is gin clear, as it tends to become in the colder months, the fish feel safer in the deepest water. And let’s face it, if you are a decent stamp roach or skimmer, do you want to be swimming in 18 inches of water where you are easily visible to predators from above and below, such as a big perch, pike or cormorants, otters and mink?
The short answer is “no”, so look at your peg, use a plummet and build a mental map of the peg’s contours.
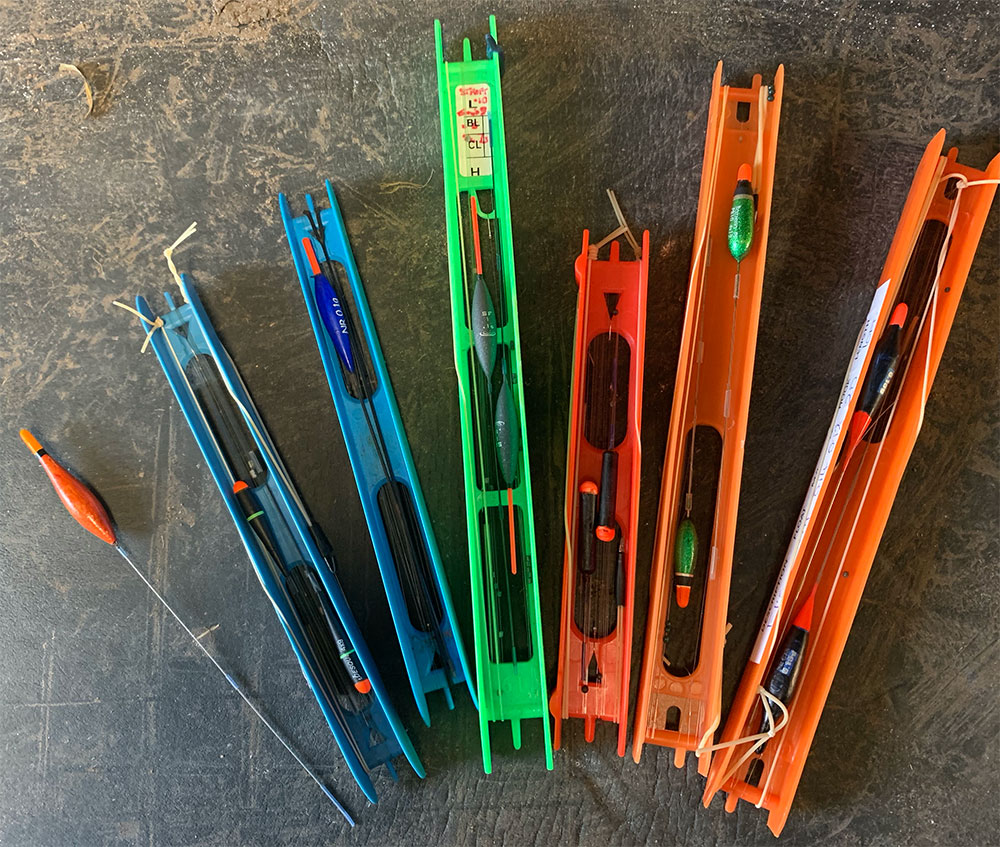
Floats – Dibbers and Standard Pole Floats – And Why
I like a mixture of dibbers, and standard pole floats with bristles for caster fishing. I employ dibbers when I am fishing in shallow water and laying a good few inches of line on the bottom. Some anglers say they can’t read bites on a dibber but as someone used to fishing stick floats on rivers, reading bites isn’t a problem. The float is either visible or not. If it isn’t visible, wait for a second or two when it buries, then lift.
I think dibbers work better than a bristled float in shallow pegs or pegs with strong tow as the angler can “hang on” to the dibber due to the buoyancy in the tip of the float. Its shape means it better resists tow and prevents the float from being pulled under by anything other than a genuine bite.
I also like dibbers in shallow water because they tend to be much shorter, lengthwise than a bristled float. And if you think about it, the shorter the float, the less intrusion in shallow water, so you are not spooking fish.
Bristled pole floats come into their own when you are only fishing a few inches overdepth, let’s say anywhere from a couple of inches to six inches overdepth. I like a bristled float in this situation because I find the bites more “readable”. Don’t get me wrong, just because it has a bristle does not mean you do not still need sensitivity and the float needs to be shotted down so that no more than 2mm to 4mm of the bristle is proud of the surface, but you do get better “readability” with a bristled float.
And talking of a good pattern to use, of what you can buy over the counter in tackle shops, my favourite current bristled pole float is the Drennan AS SF1 model. This float has a Chianti-shaped body. The key attributes are a nitinol wire stem – which springs back into shape if bent – and a selection of high-viz inter-changeable tips to suit different light conditions.
Shot And Shotting Patterns
There is no rocket science involved in setting up a caster rig. I’ll look at a few basic things that need to be factored in. Firstly, wherever possible, I prefer to shot up using genuine styl leads, not Stotz, when making up caster rigs for canals.
Why styls? For one, they are kinder to fine diameter lines used on canal pole rigs than modern shot. You can slide styls about without damaging gossamer thin line. Try doing that with shot, and it will end in tears with shot dropping off the line or the line weakening and snapping.
Reason number two for using styls is that they offer a slower fall of the rig and the hookbait through the water and their fine, delicate profile makes them less visually obtrusive to shy, wild fish.
So let’s create a basic rig from scratch. As a rule of thumb, a canal rig will incorporate a float with a shotting capacity of anywhere from .1g (3 x 10) to .4g (4 x 14).
The float will have three pieces of fine silicone sleeving on the stem, and the bottom piece will overhang by three or four millimetres to help prevent tangles.
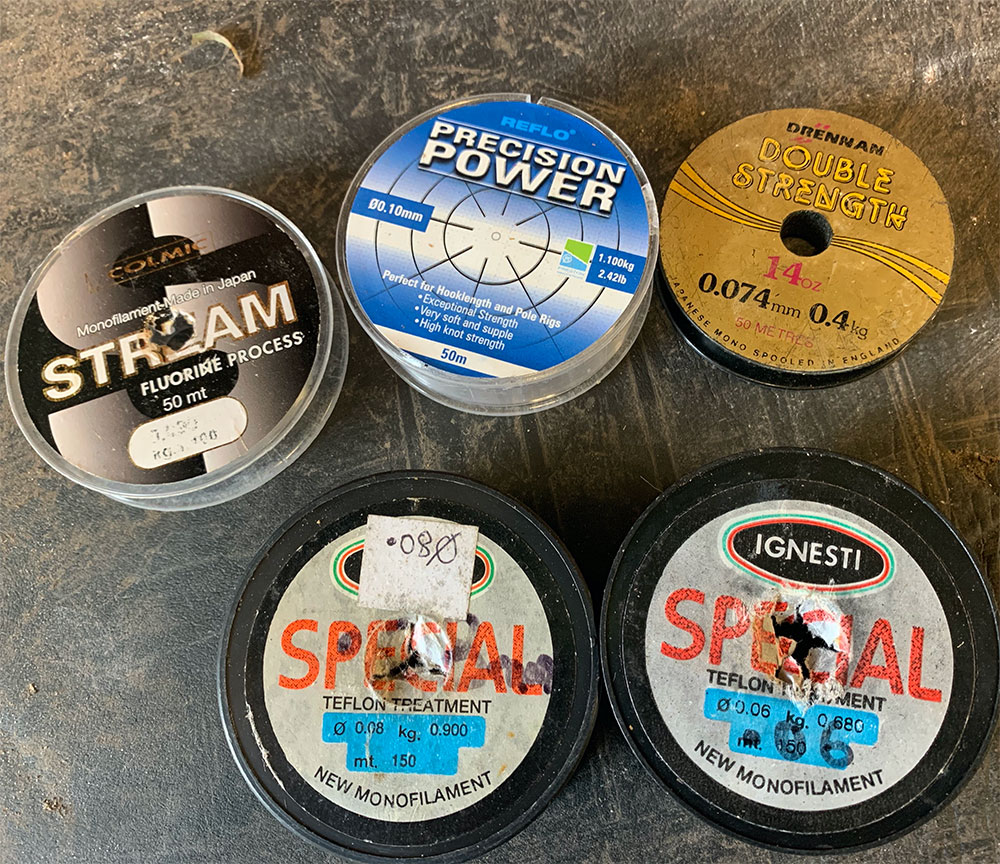
The mainline will be made from .10mm diameter line, which will have a breaking strain of 2lb plus. I tend to use Match Team line for this as it has good stretch and is robust.
The rig will be shotted to be fished in around three feet of water, so firstly, just above the loop for connecting hooklengths, I pinch on three or four half number 14 styls. These are the droppers, and because they are so tiny, they bring additional sensitivity to the rig.
I will then create a spread bulk, over a distance of say four to six inches of line, comprising No 10, no 9 and No 8 styls. The spread bulk will be positioned about 15 to 18 inches from the hook, or just below mid-depth from the pole float to the hook. All my rigs are checked at home in a water butt, and any fine-tuning can be carried out on the bank.
Hooks, incidentally, are tied up on 15cm (or six inches in old money) hooklengths.
The finished rig will comprise a spread bulk with two-millimetre gaps between the styls in the spread bulk, plus three or four half number 14 styls spread equidistantly from the spread bulk down to the hooklength loop.
On the bank, you can move the styls about and can string them out shirt-button style for a slower drop if that is how the fish want the bait presenting to them. I find that it always comes down to finding what works best on any given day.
I always try to fish with all styls off the bottom, rather than laying on several inches of line including a couple of half styls. However, there are odd days when pinning the hooklength to the deck and using those droppers by laying them on the bottom to create a “braking” effect can help, usually when a canal is towing slightly.
The Business End – Hooks and Hooklength Line
I have a selection of hook patterns that I use depending on the situation. On a hard canal when I expect bites to be at a premium, I usually start on a Kamasan B512 which is a fine wire, red-coloured wide gape hook. It is light but strong and teamed with a three to four elastic is balanced, using hooklength diameters up to .10mm.
If bream are in the peg and there is a chance of big hybrids or even a tench, I will beef up the hook to either a Tubertini Series 2 or a Colmic N957, from size 16 to 22. Sensas 3405s, a strong but fine black nickel hook, is also one of my go-to hooks if bream are showing in anything like decent numbers.
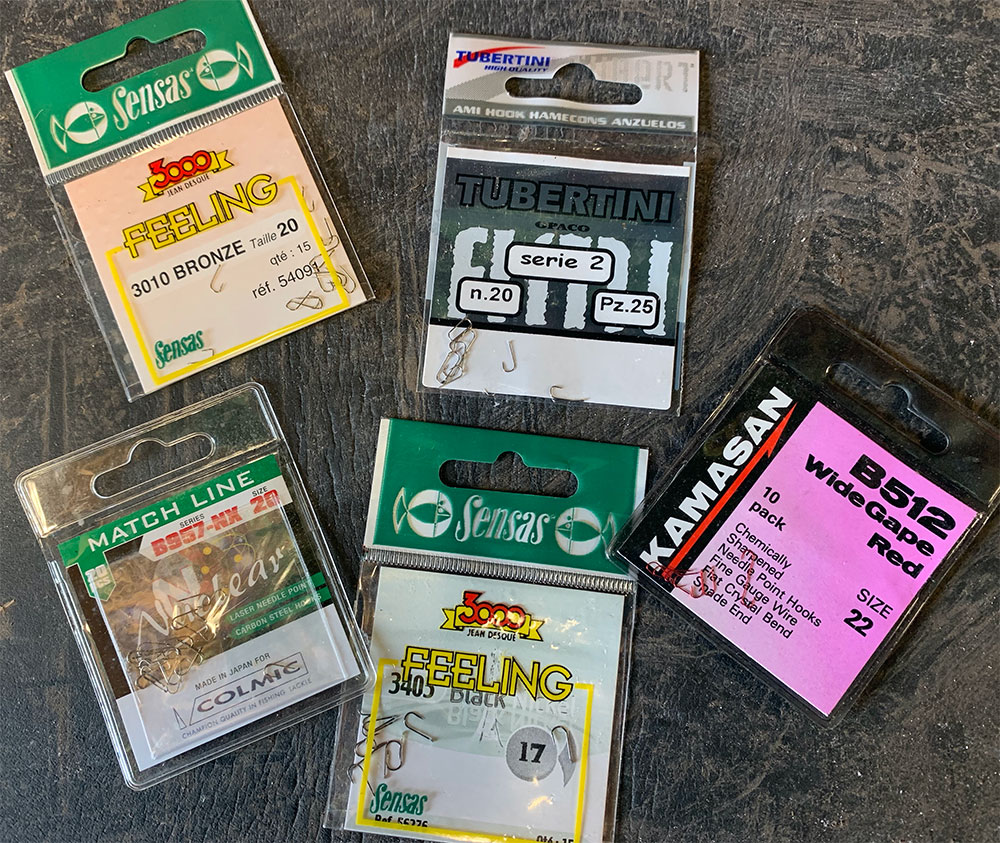
These three patterns will handle any lumps you hook, i.e. bream of 2lb plus, without being too heavy as to affect delicate presentation. These can be teamed with hooklength diameters of .085mm to .12mm and with elastics up to a number eight.
Hooklength material is a personal choice and while I use some line that you cannot buy any more – the modern-day choices for me would include Drennan Supplex, Preston Precision Power and Colmic Stream. They are all accurate, diameter-wise, and all are strong, durable and reliable.
Elastication
Just talking again about the choice of elastics, this is generally dictated by the size and species of fish you expect to encounter.
On a hard winter’s day when you are expecting little other than roach from a couple of ounces to maybe 12 ounces, you could get away with a number three elastic. However, to err on the side of safety and to give yourself the peace of mind that you might land a bonus if one comes along, why not choose a softly tensioned No 5 elastic as your starting point?
I use the Cadence CP2000 pole, and for canal work, I retain the fine number one microtip section but cut it back so that only eight or nine inches is used. I use internal 2mm bore PTFE bushes for elastication, and I then run the No 5 elastic through the cut-down microtip and all the way through the no 2 section to a mini bung. This gives me a length of around five feet of elastic, and it will stretch a long way if I hook a big fish.
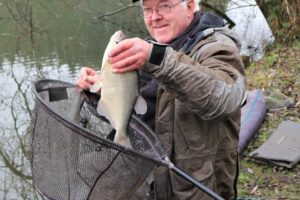
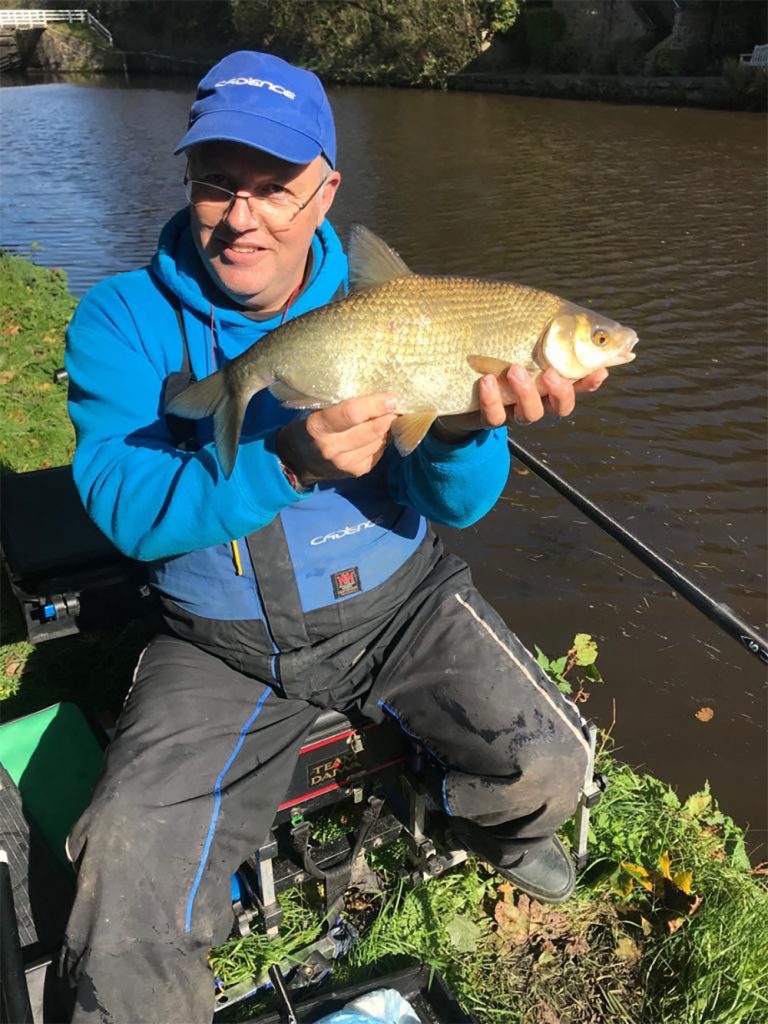
The fish below is a big 3lb-plus hybrid which took between five and 10 minutes to land. These birds think they are speedboats and when you hook one you know about it. Having a sensible elastic and enough of it in your pole top kit will help you to handle such situations.
I also make my own pole elastic micro connectors for attaching rigs to the elastic by using cut-down method feeder tail rubbers as a sleeve. The pole elastic is tied to a piece of bright orange fly line backing material made from Dacron. The elastic and Dacron are tied together using a two-turn water knot. A knot is formed at the end of the Dacron, and the rig is lasso knotted on to the Dacron.
The reason I use tail rubbers is that I find the shop-bought connector beads a bit fiddly, too bulky or too big, which can cause tangles where the rig line wraps around the fine elastic behind the bead.
Feeding when Caster Fishing
Feeding is the old chestnut that people can often struggle with, especially novice anglers or beginners. As a basic rule of thumb, I will kick off a caster session by introducing a generous palmful of well-cooked hemp and around 15 to 20 casters. These will be sprinkled over an area of three-foot square, using my pole cupping kit.
I do not expect to get bites on the caster immediately so will fish another bait elsewhere for a good 45 minutes to an hour before having a look on the shell.
But from potting in that initial helping of hemp and caster, I will flick two to six casters out to the baited area, by catapult, every 15 to 20 minutes, just to keep something falling through the water. This helps to attract inquisitive fish, and inquisitive fish attract other inquisitive fish.
Have a look after 45 minutes to an hour into the session. If the float does not go under, don’t panic. Keep feeding the odd caster every few minutes while fishing elsewhere in your peg, but keep trying it, once every half hour or so.
Don’t be static either. If you haven’t had an enquiry on the caster after a couple of minutes, lift the rig out and lay it back into the swim. Doing this can attract a bite on the drop.
Once you start getting bites, it is a case of just keeping two or three casters going in regularly to maintain interest levels in the swim.
And when you do get a bite, be patient and try to count to three before lifting to strike. Bites are generally missed by striking too early. Count to three, and you’ll hook more than you will miss.
On canals, it pays dividends to show some discipline by not going all-out to rinse a caster peg. As a rule of thumb when I have caught a couple of fish, I will purposely rest the peg, feeding for another 15 minutes, allowing the fish to regroup, allowing them to rebuild confidence, then catch a couple more.
That’s an important point and can help you to pace a caster peg and allow you to extract the maximum from it in the course of a session or a competition.
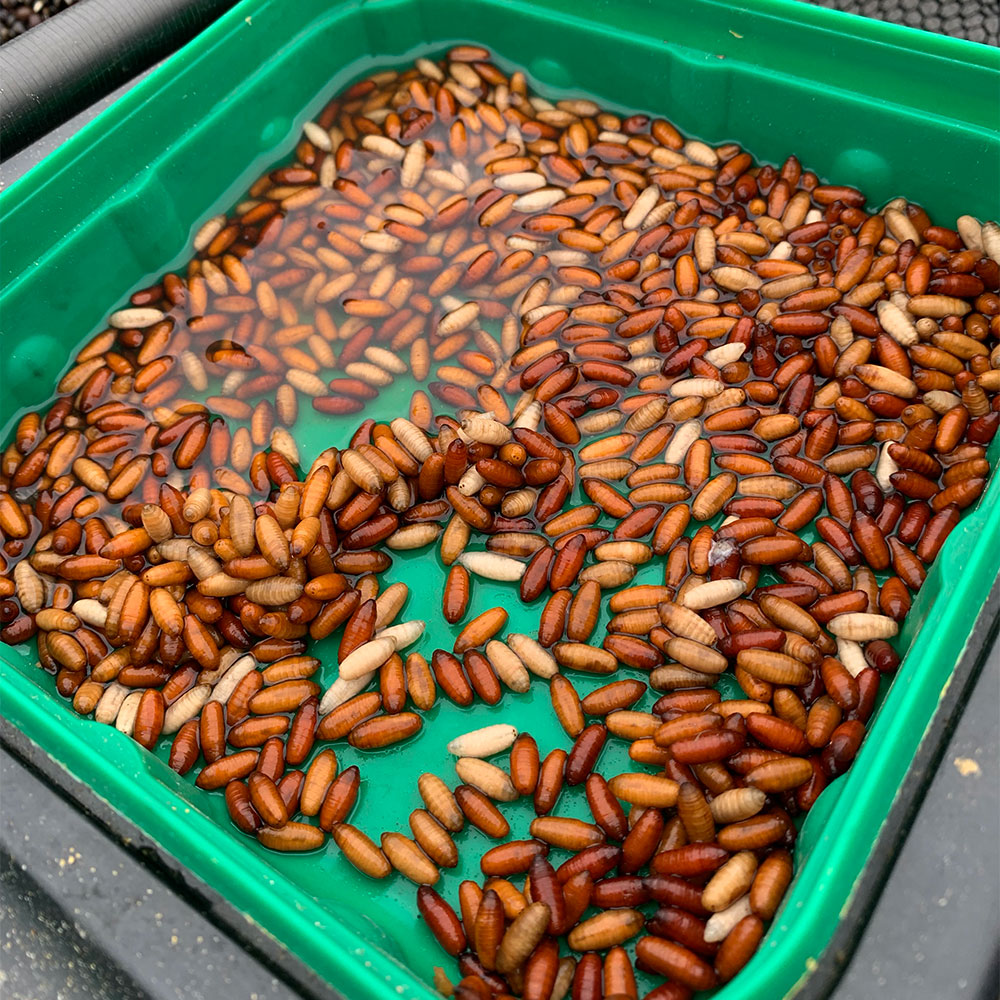
Regarding casters for the hook, try different shades. Sometimes a dark red caster or floater is best. On other days a tan caster can be lethal, while perch sometimes show a marked preference for a white caster. Keep all your options open and see what works best on any given day.
And that’s my take on the caster – a phenomenal bait which can bring rich rewards if you take the trouble to turn your own or work on refining your fishing technique a little.